
Let’s Encrypt the Web (for free)

Can you remember last time you browsed a website that said “Not Secure” on the URL address bar ? If you are a smart internet user, my guess is that it must have been a long time ago. Though you mayn’t exchange any information, sensitive or otherwise, and regardless of the website being transactional or informational, it just doesn’t give the comfort and trust to visit and further browse the site.
This blog post will focus on securing HTTP connections for a workload running on GKE using Cert-Manager and Lets-encrypt service as the free SSL provider.
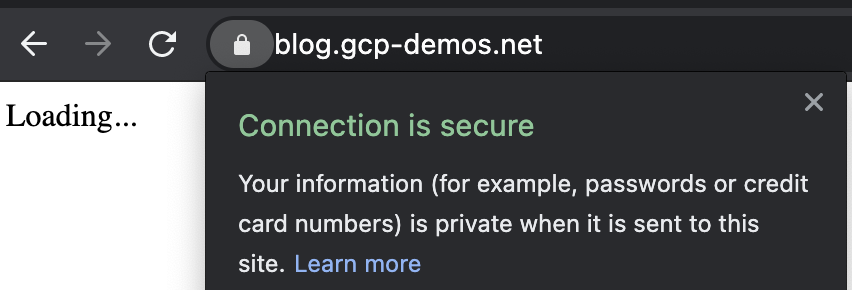
And don’t worry, the site you are reading this blog on, is secured 🙂
Why https ?
TLS encrypts your data exchanged b/w browser and server over the public internet, a.k.a “the web”, which can be a very insecure place, prone to man-in-the-middle attacks. But without possession of the private key used to encrypt the data, it is almost impossible to make any sense even if you get hold of that gibberish data. TLS Certificates are the most commonly used PKI on the web and it’s very hard to break when the bit-size of the encryption algorithm is large, see an old tweet, why ?
So you can safely assume that no one else is able to see your data or conversation.
The other main reasons for using https,
- Improved SEO ranking for your website
- Https Referrers : If you refer to an http link from an https website, it is most likely gonna be blocked with Mixed-Content warning. So people will not add your links to their website.
- Mobile browser compatibility, the latest iOS and Android demand that all connections must be on TLS. See Apple’s announcement
Let’s begin and let’s encrypt
We want to implement this architecture
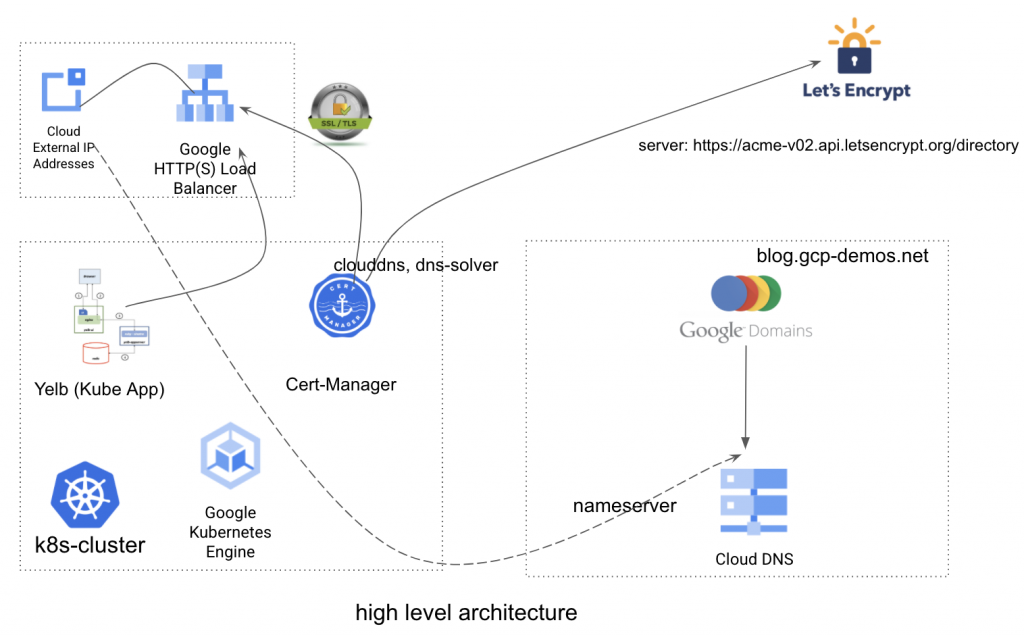
- GKE Cluster
- Cert-Manager
- ACME Let’s Encrypt , Free TLS Cert Service Provider
- My favorite Yelb restaurant voting app from mreferre (you can use any web-app, it just needs to have an Ingress )
- CloudDNS
- Google Domains
- Google Cloud LoadBalancer (Implemented internally by Kubernetes Ingress)
- External Static IP
Step 1 : Reserve a Public IP in Google Cloud
A static IP is required to be passed on to Ingress configuration, otherwise every time you create a new Ingress resource, a Load Balancer with random public IP will be created. This is tedious because one needs to reconfigure the DNS every time.
gcloud compute addresses create yelb-ext-ip --global --ip-version IPV4
gcloud compute address list
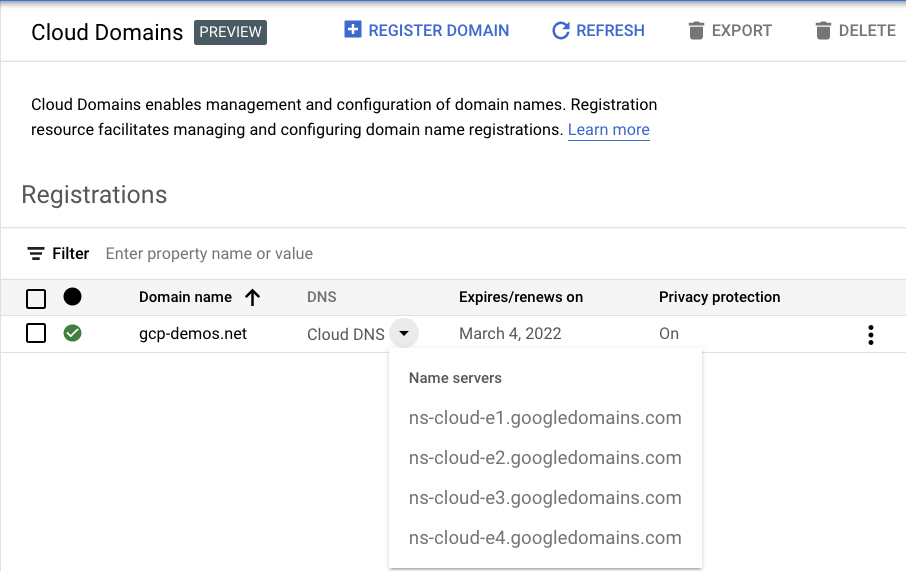
Step 2 : Secure a Domain for your App using Google Domains
While you can use any Domain Registrar service like Go-Daddy, NameCheap etc, I would recommend you use Google Domains. It is awesome and very simple. The charges are also very nominal. For my new domain gcp-demos.net it charges 1$ per month.
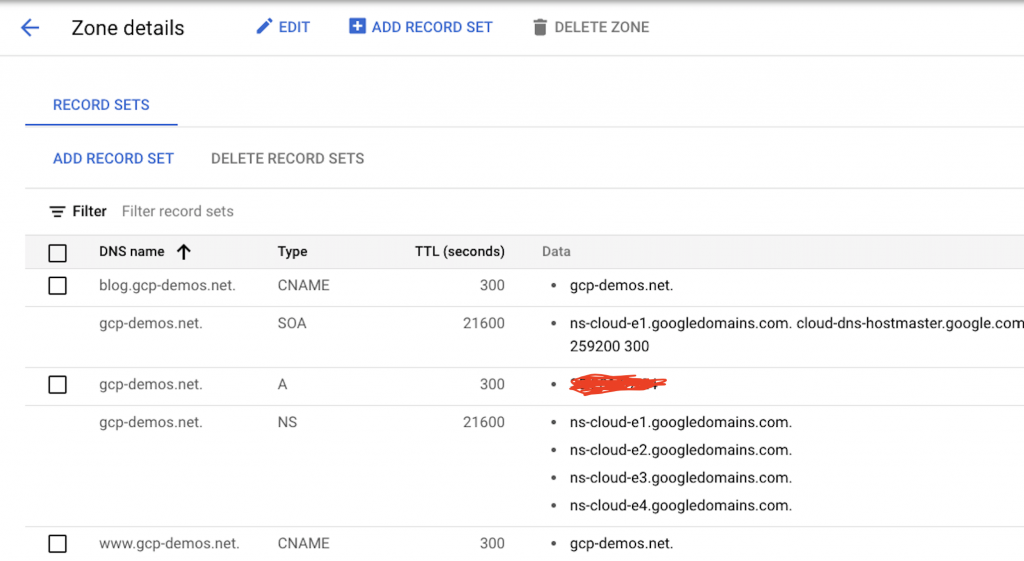
Step 4 : Register your Domain with Google Cloud DNS
Also recommend to use Google Cloud DNS for the DNS server.
Create A record with the Static IP you reserved earlier and register the base domain. Also create few CNAMEs like blog.gcp-demos.net, so we can also test validity of the TLS certificate for wildcard (*) entries too.
Note – make sure the NameServers of Google Domains is same as that of Google Cloud DNS
Step 5 : Deploy Cert-Manager
Cert-Manager is the main infrastructure to create and manage TLS certificates in kubernetes. You can deploy it using multiple methods including a helm package from Jeststack
$ helm repo update
$ helm install --version <version> <release_name> jetstack/cert-manager
For this blog, I have used the below kubectl manifest to deploy cert-manager.
kubectl apply -f https://github.com/jetstack/cert-manager/releases/download/v1.2.0/cert-manager.yamlk get pods -n cert-manager
Step 6.1 : Configure Service Account to interact with Cloud DNS
Code borrowed from :
https://knative.dev/docs/serving/using-cert-manager-on-gcp/
#Set this to your GCP project ID
export PROJECT_ID=<Your Project>

# Name of the service account you want to create.
export CLOUD_DNS_SA=cert-manager-cloud-dns-admin
gcloud --project $PROJECT_ID iam service-accounts \
  create $CLOUD_DNS_SA \
  --display-name "Service Account to support ACME DNS-01 challenge."

# Fully-qualified service account name also has project-id information.
export CLOUD_DNS_SA=$CLOUD_DNS_SA@$PROJECT_ID.iam.gserviceaccount.com

# Bind the role dns.admin to this service account, so it can be used to support
# the ACME DNS01 challenge.
gcloud projects add-iam-policy-binding $PROJECT_ID \
  --member serviceAccount:$CLOUD_DNS_SA \
  --role roles/dns.admin

# Make a temporary directory to store key
KEY_DIRECTORY=`mktemp -d`

# Download the secret key file for your service account.
gcloud iam service-accounts keys create $KEY_DIRECTORY/cloud-dns-key.json \
  --iam-account=$CLOUD_DNS_SA

  # Upload that as a secret in your Kubernetes cluster.
kubectl create secret --namespace cert-manager generic cloud-dns-key \
  --from-file=key.json=$KEY_DIRECTORY/cloud-dns-key.json

# Delete the local secret
rm -rf $KEY_DIRECTORY
Step 6.2 : Deploy a ClusterIssuer
Note that SSL Provider here is the Acme service, so please check that cert-manager Pods have egress access to reach https://acme-v02.api.letsencrypt.org/directory
If you want to restrict the ClusterIssuer to a namespace, then use Issuer instead.
Step 6.3 : Chose a DNS solver
There are 2 types of solvers HTTP and DNS based. The benefit of using DSN resolver is that it accepts multiple FQDN for the Common Name, it also accepts Wild-Card entries to create certificates.
You will notice that Cert-Manager DNS SOLVER has implementations for many Clouds, but we are interested in Google Cloud DNS, hence you will see dns01 is implemented using clouddns
kubectl apply --filename - <<EOF
apiVersion: cert-manager.io/v1alpha2
kind: ClusterIssuer
metadata:
  name: letsencrypt-issuer
spec:
  acme:
    server: https://acme-v02.api.letsencrypt.org/directory
    # This will register an issuer with LetsEncrypt.  Replace
    # with your admin email address.
    email: <Your Email>
    privateKeySecretRef:
      # Set privateKeySecretRef to any unused secret name.
      name: letsencrypt-issuer
    solvers:
    - dns01:
        clouddns:
          # Set this to your GCP project-id
          project: $PROJECT_ID
          # Set this to the secret that we publish our service account key
          # in the previous step.
          serviceAccountSecretRef:
            name: cloud-dns-key
            key: key.json
EOF
gcloud beta container --project "reju-gcct-demos" clusters create "cluster-1" --zone "us-central1-c"Step 6.4 : Issue Wild Card Certificate
# Change this value to the domain you want to use.
export DOMAIN=<Your Domain> #gcp-demos.net
kubectl apply --filename - <<EOF
apiVersion: cert-manager.io/v1alpha2
kind: Certificate
metadata:
  name: yelb-tls-cert
spec:
  secretName: yelb-tls-secret
  issuerRef:
    name: letsencrypt-issuer
    kind: ClusterIssuer
  dnsNames:
  - "*.$DOMAIN"
EOF
Step 7 : Connect & deploy your favorite K8s App
gcloud container clusters get-credentials cluster-1 --zone us-central1-c --project reju-gcct-demosIt can literally be any hello-world app, but I’ve used Yelb code (one of my favourites) and modified the Ingress and Services section to suite my need.
Original at,
https://github.com/mreferre/yelb ; thanks Massimo Re Ferrè
kubectl apply --filename - <<EOF

#apiVersion: extensions/v1beta1
apiVersion: networking.k8s.io/v1beta1

kind: Ingress
metadata:
  name: "yelb-ui"
  annotations:
          kubernetes.io/ingress.global-static-ip-name: "yelb-ext-ip"
          kubernetes.io/ingress.class: "gce"
          cert-manager.io/cluster-issuer: letsencrypt-issuer
  labels:
    app: "yelb-ui"
spec:
  rules:
    - host: blog.gcp-demos.net
      http:
        paths:
          - path: /
            backend:
              serviceName: "yelb-ui-http"
              servicePort: 80
            backend:
              serviceName: "yelb-ui-https"
              servicePort: 443
  tls: # < placing a host in the TLS config will indicate a certificate should be created
  - hosts:
    - blog.gcp-demos.net
    secretName: yelb-tls-secret
---
Step 7.1 : Ingress Configurations
The main configurations is the Ingress section of the Kube App manifest.
Annotations
kubernetes.io/ingress.global-static-ip-name: "yelb-ext-ip"
kubernetes.io/ingress.class: "gce"
cert-manager.io/cluster-issuer: letsencrypt-issuer
yelb-ext-ip is the external public ip that we reserved earlier for the load-balancer
gce class directs the Google Cloud LoadBalancer to provision the Https L7 LB
letsencrypt-issuer Is the ClusterIssuer created earlier, which has the necessary code to build the Certificate and Secret. Eventually it is this certificate which will be installed on the Ingress Loadbalncer by the the Cert-manager API.
Hosts & SecretName
  - hosts:
    - blog.gcp-demos.net
    secretName: yelb-tls-secret
Backend Services
backend:
serviceName: "yelb-ui-https"
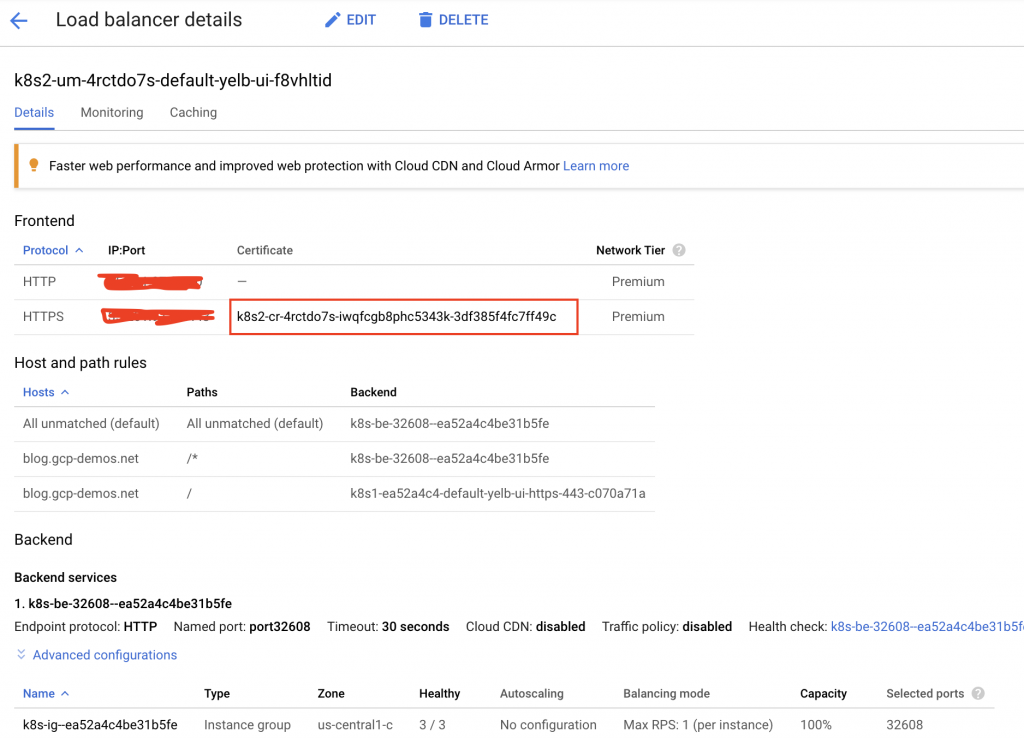
servicePort: 443Step 8.1 : Review Output of the applying the yaml spec
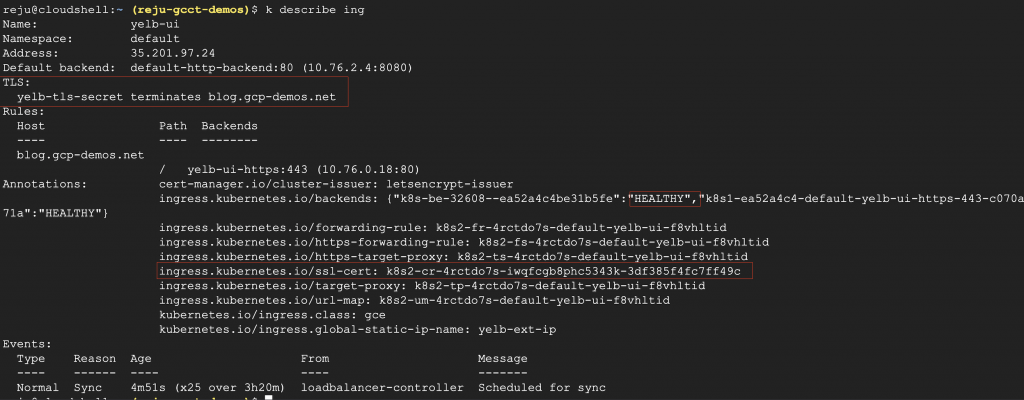
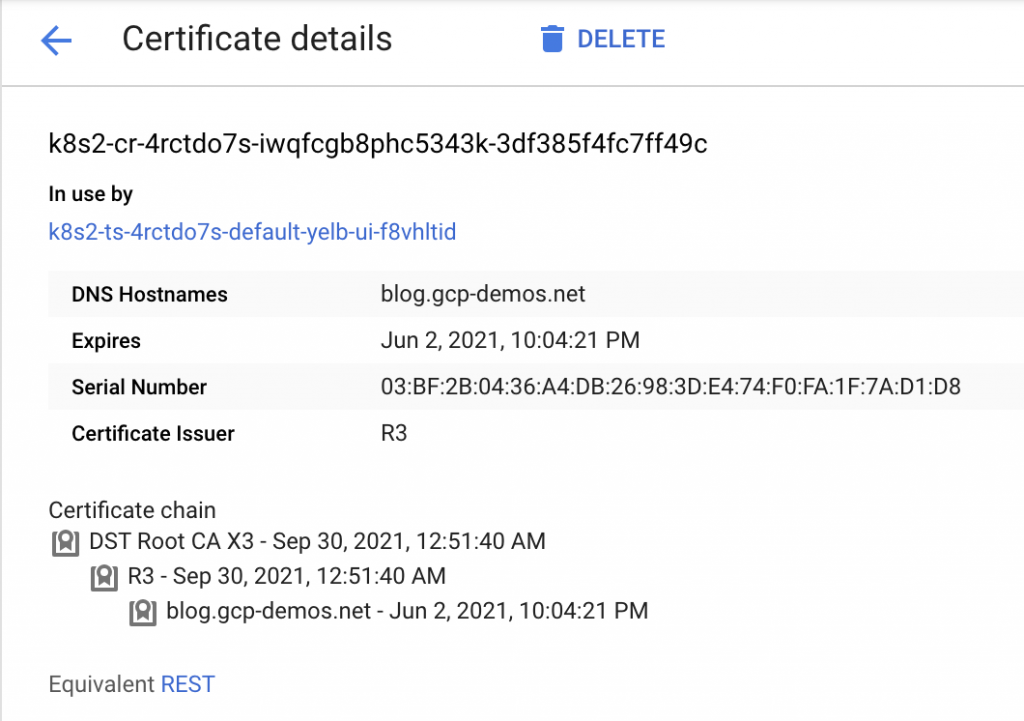
Step 8.2 : Also Review the objects with certificates getting created on the GCLB.
As you can see the API (annotation from the Ingress specs) creates an http (80) https (443) loadbalancer, and configures the certificate to the latter one.
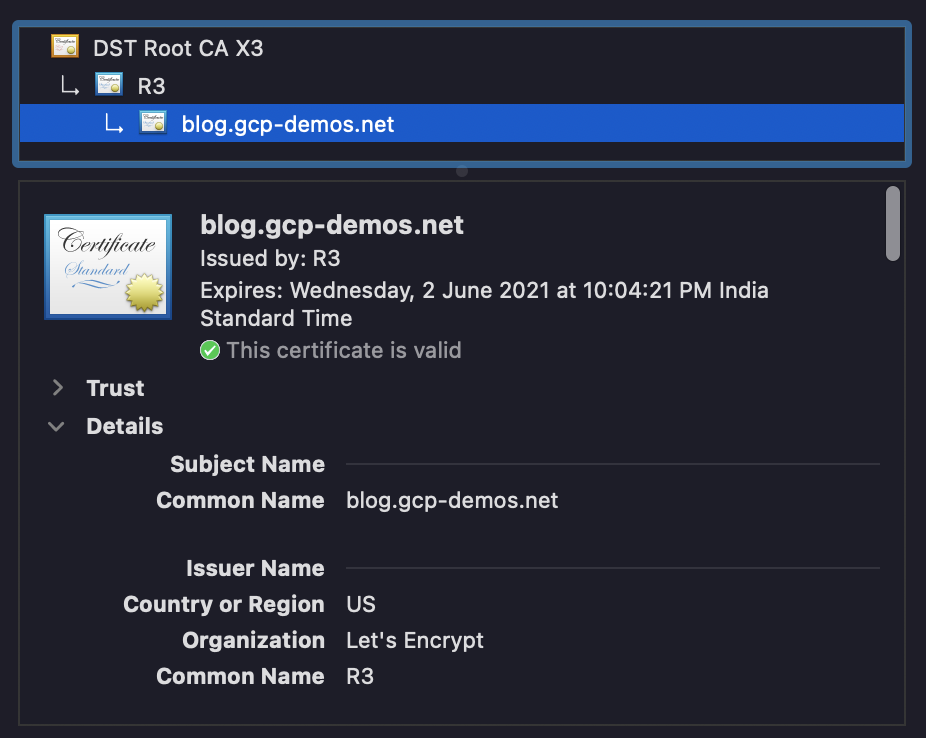
Step 9: Finally review the Web-Application
Conclusions
Let’s Encrypt is a free service backed by many large organizations and is on a mission to encrypt the Web. With more & more Cloud native workloads running on K8s, it is important to understand the mechanics behind not just creating, but managing certificates, and cert-manager is an excellent solution for this.
In this blog, we saw how to create and register a domain and use it to deploy a web-application and finally configure a TLS certificate to the https Load Balancer created by the Ingress controller.
Thanks for reading !